


-Beginner's Guide to Maintenance-|
For those of you thinking, “I bought a guitar, but does it need any special care?” or “I’ve never touched one before, so I’m hesitant to start playing!”—don’t overthink it! It’s true that maintenance is essential for getting the most out of your guitar (i.e., making it easier to play). But if you do it regularly, it’s not that hard. Since you’ve gone to the trouble of getting a guitar, you’ll want to keep it in top condition with some simple daily care.Practicing on a guitar that’s easy to play not only puts you in a better mood but, above all, helps you improve faster!
Here, we’ll introduce a beginner’s guide to guitar maintenance to help those who have just started playing or are thinking about giving it a try.


It would be a real letdown if your precious guitar—which you worked so hard to get—ended up covered in fingerprints or dust. While there are various cleaning products and maintenance supplies available, if you take care of it regularly every day, simply wiping it down with a dry cloth is enough. However, since it’s hard to do this every single day and some spots—like under the strings—are hard to reach, let’s take the opportunity to give it a good polish when you change the strings.
Maintenance Products:
Cleaning cloth, lemon oil, fretboard lubricant, contact cleaner, polish


First, use polish to wipe down the guitar body. If there’s a lot of dust or other heavy dirt, remove most of it with a dry cloth before applying the polish. For lacquer-finished guitars, be sure to choose a product labeled “safe for lacquer.”
Apply a small amount to a cloth and polish the guitar. Applying too much can actually cause a white, cloudy film to form. A good tip is to wipe in one direction.
Around the Pickup and Bridge
Since you’ve gone to the trouble of removing the strings, take this opportunity to clean areas that are usually out of reach.
|
|
| You can remove the pickups by unscrewing the four screws at the corners of the escutcheon. |
|
|
|
|
|
|
| The sides of the pickups are areas where dust tends to accumulate easily. |
|
|
|
|
|
|
| Also, on the back of the pickup, you’ll often find surprising details, such as the model name or the year of manufacture. The guitar in the photo is a Yamaha SA200S. When you remove the pickup, you’ll see “SA 56.5.9”—a stamp indicating May 9, Showa 56. Discoveries like this are really interesting, aren’t they? |
|
|
| |
|
|
|
|
|
|
| The bridge is another area that’s hard to clean thoroughly when the strings are on. Slide a cloth under the saddle and wipe back and forth with a quick, firm motion.
You can get it even cleaner by removing the saddle, but this method works well if you want a quick and easy cleanup. |
|
|
|
|
|
|
| Since we’re at it, let’s take this opportunity to check that all the screws are tight. Are the screws on the pickguard and escutcheon loose? Also, a very common issue is a loose jack nut. If this wobbles, it will produce a scratchy noise. Use a box wrench to tighten it, but be sure to remove the entire plate and hold it down from the back before tightening. If you tighten it from just one side, the jack itself may rotate and potentially strip the wiring. |


Apply a fingerboard protection oil, such as lemon oil, to rosewood fingerboards. This protects the fingerboard from drying out. Be careful not to apply too much. After applying the appropriate amount (a few drops are enough), wipe it off with a dry cloth. (I’ve had the experience of causing the frets to rust because I applied too much and left it on for too long.) I recommend doing this a few times a year, around the change of seasons. Maple fingerboards do not require oil.

As long as you play the guitar, this task will always be part of the process. Rusted strings will produce a buzzing sound, and not only will the tone suffer, but the pitch will be off as well. Additionally, if the strings aren’t wound properly, this can also lead to buzzing and tuning issues. It might seem a bit tedious, but if you don’t get this right, your progress as a guitarist will be hindered.
Required Tools
Wire cutters, string winder, wrenches, scale, various screwdrivers, box wrench

Stratocaster Edition
A set of six tuning pegs arranged in a row, all facing the same direction, is called a 6-in-line (6L) set. The Schaller type (right) and Kluson type (left) are commonly used on standard Stratocasters.

The winding method varies slightly depending on the shape of the string post.
・When there is a hole next to the string post

First, thread the string through the hole, then wrap the excess string around the post and bring it back. If this excess is too long, you won’t be able to wind it all the way, or it may cause the tuning to go out of tune. It’s no good if it’s too short either. A good rule of thumb is to wrap it around 2 to 3 times. Here’s a key point! How long is “2 to 3 turns”? It seems quite a few people get confused here. A good guideline is about 2 to 2.5 pegs! If you use this length as the excess, it will be just right.

It’s a good idea to make a crease as a marker.

This length is roughly equivalent to 2 to 3 turns.

When stringing the 1st and 2nd strings, keep in mind that there’s a string post at the end.
Next, for the winding method: start at the string post and wind counterclockwise. Wrap the string once around the top of the string that’s already threaded through the hole,

and from there on, continue winding downward.
This creates a pattern where the starting point of the string is sandwiched between the upper and lower coils. Wind the string so that there are no gaps between the strings and they do not cross over each other.

This is an incorrect winding method where the strings overlap. It will cause the tuning to be unstable.

・If there is a hole on the top surface of the string post

In this case, first insert the string through the hole from the top until it touches the bottom, then bend it to one side or the other. This is the depth of the string post’s hole.

The difference from the peg with the side hole mentioned earlier is that you cut the string before winding it. Next, measure the length of the winding allowance explained in the previous section and add the depth of the current hole. The portion beyond that is excess length, so cut it off with wire cutters. However, it’s not a good idea to just say, “Okay, got it,” and snap it off right away. This is because the impact of cutting can cause the core wire and the winding wire to separate.It’s best to bend the string as shown in the photo before cutting the tip.

After that, wind the string downward in the opposite direction. Be careful not to let the strings cross each other.
Les Paul Edition
A configuration where three strings are arranged symmetrically on each side is called a 3:3 setup. Wind the strings clockwise for the 1st, 2nd, and 3rd strings, and counterclockwise for the 4th, 5th, and 6th strings.

Basically, this is the same as the “when there’s a hole next to the string post” scenario explained in the [Stratocaster Guide], but the length of the string wrap should be about one and a half tuners. Please note that this may not apply depending on the height of the string post.
・String Lifespan
So, how often should you change your strings? Opinions seem to vary from person to person. The most common answer is about once every 1 to 2 months. Of course, this depends on how often you play, but if you’re just playing as a hobby, I think that frequency is generally sufficient. However, for professional guitarists, it’s not uncommon to change strings every time they play.Also, simply wiping the strings with a dry cloth after each performance—or spraying them with a product like Slide Move and then wiping them dry—seems to extend their lifespan.
It’s also common for just one string to break, but unless you’ve just replaced them all, I think it’s best to replace the entire set.

This refers to the distance between the neck surface and the strings. Strictly speaking, it refers to the gap between the top of the fret and the bottom of the string. Measure this at the 12th fret on both the 1st and 6th string sides using a scale.

While the ideal string action varies by guitar, generally it’s around 1.5 mm to 2.0 mm at the 12th fret on the 1st-string side and around 2.0 mm at the 12th fret on the 6th-string side. These are merely guidelines—there’s no single “correct” answer.However, this setting is extremely important because it directly affects playability and, more specifically, the sound. Lower string action improves playability, but it can sometimes lead to buzzing. Conversely, a higher string action requires more grip strength to press the strings down, which may make it difficult to perform techniques like fast picking. On the other hand, the increased string tension results in a better tone. Please find the string action that best suits your playing style and preferences.
Stratocaster Edition
On a Stratocaster, you adjust the string height by changing the height of the set screws on each string’s saddle.Hex wrenches come in inch sizes (1.27 mm) and metric sizes (1.5 mm). Generally, metric sizes are more commonly used on Japanese-made guitars, while inch sizes are more common on foreign-made guitars. Set the saddles so they form a gentle arch that matches the curvature of the fretboard (known as the “R”). Here’s a key point! Even though the saddles form an arch, the saddles themselves must be parallel to the bridge!

Occasionally, you’ll see guitars where the saddle itself is set at an angle, but this is incorrect.

Les Paul Edition
On a standard Les Paul bridge, you can’t adjust the string height for each string individually. Once you set the height using the adjusters on the 1st and 6th string sides, the string heights for the other strings will naturally fall into place. It’s best to start with the bridge set slightly higher and then lower it as you go.


Even after tuning the guitar carefully with a tuner, you might feel like the pitch is off when playing in the higher positions… This is what’s known as an out-of-tune octave. Simply put, when you fret an open string, tension is applied to the string proportional to how much you press it down, so the pitch naturally rises. Octave tuning corrects this rise by lowering the bridge position. You adjust this at the 12th fret.
First, tune the guitar as usual using a tuner. Next, adjust the saddle forward or backward so that the pitch of the open note at the 12th fret matches the pitch of the harmonic at the 12th fret.
*If the open note is too high → move the saddle backward; if it’s too low → move it forward.

・What are harmonics?
Harmonics are produced by lightly touching the string just above a fret—rather than pressing it down—and then plucking it. Until you get used to it, it’s okay to keep your finger on the string. Even then, you’ll still get a sound that sort of resembles a harmonic. Once you get the hang of it, if you lift your finger at the moment of plucking, you’ll get a clean, “ping” sound.
*Please perform octave tuning after replacing the strings with new ones, and only after the neck condition and string action have been adjusted.

Since this feature is essentially titled “Maintenance for Beginners,” I hesitated to go into further detail here. However, since the sequence of “string replacement → neck adjustment → string action adjustment → octave tuning” forms a single process, I’ll briefly outline it. If you’re unsure about neck adjustment or don’t understand it, don’t force the issue—be sure to ask a music store for help.

When the strings are strung (and the guitar is in tune), the guitar neck is actually subjected to a load of about 70 kg. Although the neck is designed to withstand this weight, it can warp due to temperature, humidity, or being left unused for long periods. Neck warping is broadly categorized into two types: “forward bow” (see figure below) and “backward bow” (see figure below).When the neck warps, the string action becomes too high, making the guitar difficult to play; conversely, the strings may hit the frets, causing the sound to become muffled. To address these issues, a steel rod called a truss rod is built into the neck; by turning this truss rod, you can correct the neck’s warp to a certain extent. There are two types of truss rods: those adjusted from the headstock side and those adjusted from the neck joint side.

・Types of truss rods adjusted from the headstock

・Types adjusted from the neck joint


The type adjusted from the headstock side is adjusted using a pipe wrench or an Allen wrench. Wrenches come in various sizes, and one may be included when you purchase the guitar. Please be careful: if you force it with a wrench that doesn’t fit, the socket may strip, making further adjustments impossible.
To correct a forward bow, turn the truss rod clockwise. When doing so, avoid turning it too much at once. Turn it gradually and check the results—repeat this process. To correct a backward bow, turn the truss rod counterclockwise. Also, depending on the neck, some may be difficult to correct for a backward bow, while others respond well to adjustment. If you try this and see no improvement, consult a professional at a music store.
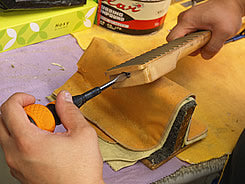
The same applies to the neck-end type; there are hex wrench and Phillips-head types. For the Phillips-head type, please use a large flathead screwdriver.
Also, if you force the truss rod too much, it can break or come loose from the locking mechanism on the opposite end, so handling it requires some experience and knowledge. If you’re unsure, don’t force it—be sure to consult a music store or other professional.
What did you think? This is the “Heart-Pounding Guitar Tinkering” series: Beginner’s Guide to Maintenance. If you can do just this much, you’ll be able to practice comfortably and with peace of mind at any time. While you should leave it to a professional if the issues mentioned above aren’t resolved, I believe it’s important to have the mindset to perform basic maintenance yourself. As I mentioned earlier, you’ll improve much faster if you practice on a guitar that’s easy to play.
I hope this has been of some help to you as you improve your guitar skills.