


The most important policy of Okubo Wind Instrument Store is "thorough adjustment/repair" of our products. It has been 20 years since we opened our store in Shin-Okubo as a used musical instrument specialty store. As you know, this is a town where many famous stores specializing in wind instruments are located. We have been trained in an environment where we are inevitably compared. The image of shiny "new products" lined up in the stores around us and the image of "used products" handled by our store. We are at a disadvantage when we start out, and we cannot stand on the same playing field with ordinary adjustments/repairs. That is why we do not compromise on the adjustment/repair of incoming goods. We do not entrust all repairs to technicians who repair wind instruments in general, but rather we ask technicians who specialize in brass instruments, double reeds, flutes, and single reeds, in order to maximize the potential of the instruments we receive.
When we first opened our shop, we were only told, "Oh, you adjust the instruments so that they can be played, huh? Of course, there is no goal in improving our skills, so we do not intend to settle for the status quo. We are always listening to the requests and opinions of our customers, and are working daily on the adjustment and repair of used wind instruments to further satisfy our customers.


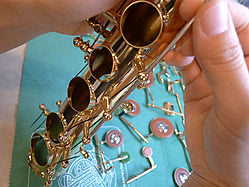
The repaired instrument this time: H.SELMER alto saxophone SERIE II. It has been used for less than about 2 years, but 10 years have passed since its manufacture. At first glance, it looks clean, but in fact...
|
1. check the condition of the instrument
The first step is to check the instrument all over.
Check the tampo (=pad)
We check the condition of each and every tampo that is currently installed. Even if the tampo is "usable for the time being," it should not be used. We judge the condition of the tampos based on the level at which the customer will be able to use them comfortably for several years to come. In this case, all the tampos were replaced. About 90% of the saxophones we handle at our store have all tampos replaced.
Checking for distortion
Many people are concerned about dents, but distortion is actually more important to pay attention to. Distortion is a slight deflection that is not noticeable at first glance, so many people use the instrument without noticing it. However, if the slight distortion is left unchecked, it can have a negative impact on the key balance, action, and overall sound.
Check for dents

Dents in their current state will of course have a negative impact on the sound, but you must be very careful about how you repair them. The saxophone is an instrument that vibrates more than brass instruments. As we will discuss later, to avoid metal metamorphosis caused by excessive sheet metal, we choose to repair dents without hammering as much as possible.
Check for wear and tear pain, rust, spring condition/key movement, rattling, etc.
We will check whether the rattling is due to distortion or wear and tear.
2. disassemble the instrument
|
While checking the movement of the keys, remove the parts.
|
|
|

There are so many parts attached to a single alto saxophone!
|
Remove the No. 2 pipe (straight pipe) and No. 1 pipe (U-shaped pipe).
|
|
|

|
The whole disassembled state. Once again, check for distortion and dents.
|
|
|

3. correction of distortion and dent
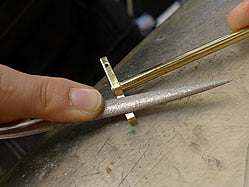
Correct this small dent (on the side of the first pipe's radius). Can you see it? The part where the light looks a little distorted is the dent.
|
The core that matches the shape of the bell.
|
|
|

|
Correct the indentation through the core ring.
|
|
|

|
To avoid putting extra burden on the metal, we correct the dents without hitting it with a hammer as much as possible.
|
|
|

The state after correcting the dents. The reflected light does not distort the surface and creates a beautiful curve.
4. maintenance of tone holes
Surprisingly, many saxophones are tampo-matched with tone holes that are not flat or have burrs remaining at the manufacturing stage. However, in order to obtain a precise sealing without putting unnecessary stress on the tampo, the tone hole must be flat and clean. Therefore, when replacing the tampo, the tone hole is flattened by hand.
Will the height of the tone hole be lowered? You may be worried that the height of the tone hole will be lowered, but we will flatten it with the minimum amount of shaving. Even in the case of a very poorly made instrument, the difference will be limited to a maximum of 0.5 mm.
The tone holes are prepared in the following order: filing, filing with a file covered with a fine-grit sandpaper, and deburring with a file.
|
Filing
|
|
|

|
File with a file covered with a fine-grit sandpaper.
|
|
|

|
Deburring with a deburring tool Carefully remove burrs as they can damage or tear the tampo and cause stickiness and biting.
|
|
|

5. spring rust removal and instrument cleaning
|
Wash the instrument with a neutral detergent containing a surfactant. Items to be washed are the windpipe, neck, mouthpiece, ligature, cap, and socket. Before washing, remove the rust from the spring and remove the cork from the neck. Scratch the cork with a file to prevent it from peeling off when it is wound. The joint parts are polished and cleaned with benol.
|
|
|

Wash with neutral detergent with a good lather.
|
After cleaning, wipe off water well and apply rust inhibitor to the spring.
|
|
|

6. replacement of consumable parts and cleaning of keys
The tampo is attached to the cup with a solvent called shellac. Heat the cup with a burner to melt the shellac inside and remove the tampo. Clean off the old shellac.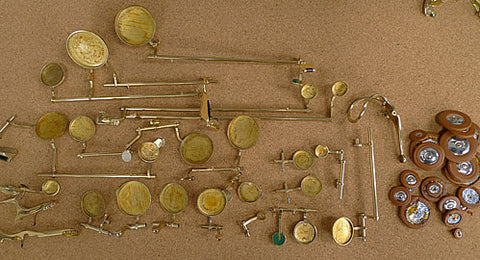
|
Remove the cork, tube, and felt.
|
|
|

|
File flat the areas where the cork and felt will stick. By filing scratches, the adhesive material can penetrate into the scratches and adhere firmly.
|
|
|
|
The filed area should be burr free.
|
|
|

|
Clean and disinfect each key with Zippo oil and ethanol.
|
|
|

|
Clean the inside of the pipe and all the core clamps.
|
|
|

Put on a new tampo.
If the size of the tampo is exactly the same as the inner diameter of the bottom of the cup, there will be a small margin when the tampo is installed in the cup, and the tampo will not fit properly and be stable. Many instruments shipped from the factory with tampos that are not only the same size as the inner diameter of the cup, but are even smaller than the cup itself.
|
The tampo of this H.SELMER SERIEII. It is a factory tampo because the instrument has never been sent for adjustment since it was purchased new.
|
|
|

|
If there is a gap between the cup and the tampo, as shown in the upper right photo, it is impossible to fully insert the shellac that serves as the adhesive. When the tampo is removed, there is usually only a small amount of shellac in the tampo like this.
|
|
|

|
If there is enough shellac between the cup and the tampo, the inside will look like this.
|
|
|

|
The tampo should be 0.5 mm larger than the inner diameter of the cup.
|
|
|

|
Shellac is crushed into flakes and placed in the cup in the proper amount.
|
|
|

|
and melt it over a burner.
|
|
|

|
Melt further.
|
|
|

|
Place the tampo in the cup and attach the tampo flat with a spatula while pushing the booster into the cup.
|
|
|

|
Attach with even pressure.
|
|
|

|
Attach the cork. (photo left) Synthetic cork: Does not change easily under pressure and does not allow moisture or oil to penetrate. Durable. (Right)Natural cork: Easily changes when pressure is applied, and moisture and oil penetrate easily. Cushioning and noise resistance.
|
|
|

|
These two types are used in appropriate places. There are about five different thicknesses for each.
|
|
|

|
As shown in the photo, natural cork is used for most parts at the factory. (There is a difference depending on the manufacturer.)
|
|
|

|
However, the cork in the parts related to the balance and the parts where each key exerts pressure on each other are like this, even in the beautiful instrument that has been repaired this time and has been used infrequently.
|
|
|

Synthetic cork is used in areas where pressure is easily applied, or where oil is used to improve slippage.
Attach felt.
|
Use woven felt for areas where thickness is required, rather than felt made of compressed fibers.
|
|
|

|
The felt used should be pressurized and allowed to sink to a certain point before attaching to the key. This is to minimize the changes that occur during use.
|
|
|

Attaching the Tube
|
Different materials and thicknesses of tubing are used for different parts.
|
|
|

For example, for octave keys, we use silicone tubing, which is less noisy, and then heat-shrinkable tubing is placed on top of the silicone tubing and heated with a burner.
The heat-shrinkable tubing shrinks and adheres snugly to the inner silicone tubing.
Put grease in the roller parts.
|
The roller part is made of a material that can withstand long-term use. However, since the rollers are easily greased by direct contact with perspiration from hands, it is recommended to consider it as an indication that it is time for periodic adjustment when the grease is removed and noise is generated from the rollers or when the movement becomes sluggish.
|
|
|

7. corking the neck
Cork winding
Coat the neck with shellac beforehand.
Heat the neck, and when the shellac is melted, wrap the cork around the neck.
Heat the inside of the neck while crimping the cork to re-melt the rack and glue it in place.
Shape with a sandpaper file until it is the right size for the mouthpiece.
8. aligning the neck and removing any rattles
Right hand key row, left hand key row
Right hand key (F)

|
The position of the post is adjusted so that it passes smoothly through the middle of each individual post hole.
|
|
|
Remove the rattling between the center knob and the post.
Next, remove the rattling between the core bar and the post. When you insert the long bar and tighten it with a screwdriver, you may find that there is a rattling between the head of the bar and the post.
Not only rattling occurs after many years of use, but also defects from the time of manufacture are surprisingly common.
Have you ever had a core spring pop out while playing? The most common cause is when there is rattling in this area.
Right hand row, left hand row, octave key, lowE
|
In particular, if the rattling is not removed from the right hand row, it is easy to have symptoms such as unstable balance, difficulty in producing subtones, and difficulty in producing low notes. Furthermore, if the rattling is too large, a metallic noise may be heard when moving the right hand, no matter how much adjustment is made. (Actually, since the rattling is the cause, it should be impossible to make a proper adjustment, but many instruments are manufactured with a lot of rattling...)
|
|
|

(To take out vertical and horizontal rattling of the key.
The key fits between the post and the post, but if the pipe length of the key is shorter than the length between the posts, the key will rattle. This is horizontal rattling.
|
Conversely, if the pipe length of the key is longer, it will be too tight to enter, but this may be because the post itself is collapsed on either side. In addition, the key may rattle up and down, left and right, because there is more space than necessary between the core clamp and the pipe of the key. This is vertical rattling. Both horizontal rattling and vertical rattling are taken care of.
|
|
|

|
F in conjunction with F, E, and D on the right hand side. The other parts of the core ring are also adjusted in the same way.
|
|
|

9. spring bending and lubrication
Squeeze and re-bend the spring.
|
Each key is moved by a needle spring attached to the post. Therefore, the touch and strength of the key depends on how this spring is bent. The spring is bent into shape by grasping it with a tool and squeezing it.
|
|
|

Lubrication
Put a gel-like substance similar to grease in the core spring part.
Put more gel and blend it well once through the core metal before assembling the key. Wipe off the overflowed grease.
We are often asked "Where do I put the key oil? We are often asked "Where do I put the key oil?It is not necessary for the customer to put key oil.
|
Even if you put oil between the post and the key when the key is assembled, it will not go into the key, and we often see instruments that are soaked in oil because the key is stuck in the post and cannot be wiped clean. Lubrication should be left to the technician during adjustment. If the instrument has been properly cleaned, there will be no noise due to lack of oil during the periodic inspection every six months to a year. |
|
|

|
Use heavy grease for the screw parts, which was also used for the roller parts earlier. Unlike other instruments, the construction of the SERIE II's screw holder differs from other instruments in that there is a deep cavity inside each end of the key, which is fastened with a screw, and a spring-loaded screw holder is placed inside. Remove the screw mounts one by one and put a lot of grease in the cavity. |
|
|

10. aligning the tampo
We often hear that the tampo is right or wrong, but in the end, what does it mean that the tampo is right? We often hear that the tampo is right or wrong, but in the end, what does it mean that the tampo is right? I am sure that many of you are wondering, "What does it mean that the tampo is right after all? Simply putIf the tampo lands on the circle of the tone hole at the same time, the tampo is aligned.If the tampo lands on the tone hole circle at the same time, the tampo is in tune. If the tampo lands a little earlier than the circle, the feel will be different.
|
First, look at the state of the cup and tampo through the light. |
|
|

|
Correct the tone hole so that it is in the middle of the tampo. (In some cases, due to the structure of the key, it may not be possible to bring the tone hole to the center of the cup.) |
|
|

|
If it is tilted to the left or right, make sure that the cup and tone hole are parallel. The cup is tilted up to the right. Light leaking from the right side is another factor to judge. |
|
|

|
The state where the tilt of the cup has been cured |
|
|

|
In the same way, change the angles of the front and back sides of the cup so that the tone holes and the cup are parallel and naturally align with each other on all sides. Melt the shellac by scorching the cup with a burner. |
|
|

|
Make further fine adjustments with a spatula so that the tampo lands on the tone hole all over at the same time. |
|
|

11. balancing and opening
Adjust the keys so that they are all in position at the same time.
Set each key to the appropriate opening.

12. gluing the second pipe (straight pipe) and the first pipe (U-shaped pipe)
|
H. Selmer's SERIE II is a straight pipe,In fact, there is only grease in the connection between No. 2 tube (straight tube) and No. 1 tube (U-tube).In many cases, the connection between No. 2 (straight) and No. 1 (U-tube) is only covered with grease. |
|
|

|
This part is assembled with adhesive. |
|
|

|
If the bell post is distorted as shown in the photo, re-bend it before assembling. |
|
|

|
State after correction |
|
|

13. assemble the keys in order and adjust
Assemble the keys in order and adjust them.

Balance
Keys that are interlocked need to be balanced. At the beginning of use, the pressure on the balance cork causes the cork to sink, which can easily lead to imbalance.
The pressure on the balance cork will cause the cork to sink, the tampo will become more comfortable and the ruts will deepen, causing the balance to shift, and the key will deflect when the key is pressed.
The first balance is set in light of these three factors.
Opening, playing
Openness is the distance between the tone hole and the tampo. It determines the sound release and pitch balance. The opening is determined at the same time as the balance, and the playing is also done at the same time. (Play -> The key part that is linked to the tone hole may have play depending on the thickness of each opening cork, so the cork is shaved to eliminate play.)
(Play -> The interlocking keys may have play depending on the thickness of the corks, so the corks are shaved so that there is no play).
|
Generally, when people think of saxophone adjustment, they probably think only of this final balancing step. Of course, this is the most important point, but it is also important how carefully the previous stages (items 1 through 11) are corrected and maintained. If your instrument has such a symptom, it is possible that the previous steps of balancing have not been taken care of, even though they should have been taken care of before balancing. |
|
|

14. final check and in-store display
|
After all adjustments are completed, a trial check is made. |
|
|

The adjustment work is completed by displaying them in the show window.
Before shipping to the mail order or purchasing in the store, we will inspect it once again. The same applies to the display items that have been on display for one month after adjustment.

How was it?
Selmer SERIE II, which looked beautiful after less than 2 years of use, had many parts that needed to be touched up. We do not only repair the damaged parts as a used item,We also take a scalpel to the imperfections from the time of manufacture.We hope you can understand that we not only repair the damaged parts as used products, but also make careful adjustments to the imperfections from the time of manufacture. This is the result of what I said at the beginning of this article: "As a used equipment dealer with strong prejudice, it takes more than ordinary adjustments and repairs to stand on the same footing as the best stores around. Nearly 90% of our inventory has undergone the same adjustment process. This is true even for entry-level models. This is not a special adjustment, but rather the same process that is used at THE used music store.Standard adjustment process for saxophones sold at THE used music store.This is the standard adjustment process for saxophones sold at THE used music store. We hope that those who think "used saxophones are not so good..." will give this a try. We guarantee that your image of "used saxophone" will be changed.
Introduction of our technical staff for saxophone repair and adjustment

Ayumi Kawabata (photo at the back)
Okubo Wind Instrument Store/Repair Staff・・・Saxophone・Clarinet Repair
Keita Odagiri (front in photo)
Saxophone repair store [Odagiri Kobo] - Technical support for saxophone adjustment, general request for correction of dents and distortions in the saxophone body.
Introduction of Odagiri Workshop

He started playing the saxophone at the age of 12. After graduating from high school, studied performance techniques at a music school, then joined a domestic saxophone manufacturer specializing in saxophones. After graduating from high school, he joined a domestic saxophone manufacturer, where he learned manufacturing and repair techniques. Currently, he has established "Odagiri Workshop," a repair store specializing in saxophones, and provides the best repair techniques to all saxophone players, regardless of whether they are professionals or amateurs, and regardless of genre.